Extending with Loaders#
As you have seen so far, loaders are one of the building blocks of webpack. If you want to load an asset, you most likely need to set up a matching loader definition. Even though there are a lot of available loaders↗, it’s possible you are missing one fitting your purposes.
You’ll learn to develop a couple of small loaders next. But before that, it’s good to understand how to debug them in isolation.
Debugging loaders with loader-runner#
loader-runner↗ allows you to run loaders without webpack, allowing you to learn more about loader development. Install it first:
npm add loader-runner -D
To have something to test, set up a loader that returns twice what’s passed to it:
loaders/demo-loader.js
module.exports = (input) => input + input;
Create a demo.txt file with text in it to the project root as well.
There’s nothing webpack specific in the code yet. The next step is to run the loader through loader-runner:
run-loader.js
const fs = require("fs");
const path = require("path");
const { runLoaders } = require("loader-runner");

runLoaders(
  {
    resource: "./demo.txt",
    loaders: [path.resolve(__dirname, "./loaders/demo-loader")],
    readResource: fs.readFile.bind(fs),
  },
  (err, result) => (err ? console.error(err) : console.log(result))
);
If you run the script now (node ./run-loader.js), you should see output:
{
  result: [ 'foobar\nfoobar\n' ],
  resourceBuffer: <Buffer 66 6f 6f 62 61 72 0a>,
  cacheable: true,
  fileDependencies: [ './demo.txt' ],
  contextDependencies: [],
  missingDependencies: []
}
The output tells the result of the processing, the resource that was processed as a buffer, and other meta information. The data is enough to develop more complicated loaders.
fs.writeFileSync("./output.txt", result.result) or its asynchronous version as discussed in Node documentation↗.
loaders: ["babel-loader"].
Implementing an asynchronous loader#
Even though you can implement a lot of loaders using the synchronous interface, there are times when an asynchronous calculation is required. Wrapping a third-party package as a loader can force you to this.
The example above can be adapted to asynchronous form by using webpack specific API through this.async(). Webpack sets this, and the function returns a callback following Node conventions (error first, result second).
Tweak as follows:
loaders/demo-loader.js
module.exports = function (input) {
  const callback = this.async();

  // No callback -> return synchronous results
  // if (callback) { ... }

  callback(null, input + input);
};
this, the shorter function form (() => ...) cannot be used here.
Running the demo script (node ./run-loader.js) again should give the same result as before.
To raise an error during execution, try the following:
loaders/demo-loader.js
module.exports = function (input) {
  const callback = this.async();

  callback(new Error("Demo error"));
};
The result should contain Error: Demo error with a stack trace showing where the error originates.
Returning only output#
Loaders can be used to output code alone. You could have an implementation as below:
loaders/demo-loader.js
module.exports = () => "foobar";
But what’s the point? You can pass to loaders through webpack entries. Instead of pointing to pre-existing files as you would in a majority of the cases, you could give to a loader that generates code dynamically.
Buffer output, set module.exports.raw = true. The flag overrides the default behavior, which expects a string is returned.
Writing files#
Loaders, like file-loader, emit files. Webpack provides a single method, this.emitFile, for this. Given loader-runner does not implement it, you have to mock it:
run-loader.js
runLoaders(
  {
    resource: "./demo.txt",
    loaders: [path.resolve(__dirname, "./loaders/demo-loader")],
    context: { emitFile: () => {} },
    readResource: fs.readFile.bind(fs),
  },
  (err, result) => (err ? console.error(err) : console.log(result))
);
To implement the essential idea of asset loading, you have to do two things: emit the file and return path to it.
To interpolate the file name, you need to use loader-utils↗. Install it first:
npm add loader-utils -D
Apply the logic as below:
loaders/demo-loader.js
const loaderUtils = require("loader-utils");

module.exports = function (content) {
  const url = loaderUtils.interpolateName(this, "[hash].[ext]", {
    content,
  });

  this.emitFile(url, content);

  const path = `__webpack_public_path__ + ${JSON.stringify(url)};`;

  return `export default ${path}`;
};
Webpack provides two additional emit methods:
this.emitWarning(<string>)this.emitError(<string>)
These calls should be used over console based alternatives. As with this.emitFile, you have to mock them for loader-runner to work.
The next question is how to pass a file name to the loader.
Passing options to loaders#
To demonstrate passing options, the runner needs a small tweak:
run-loader.js
const fs = require("fs");
const path = require("path");
const { runLoaders } = require("loader-runner");

runLoaders(
  {
    resource: "./demo.txt",
    loaders: [path.resolve(__dirname, "./loaders/demo-loader")],
    loaders: [
      {
        loader: path.resolve(__dirname, "./loaders/demo-loader"),
        options: {
          name: "demo.[ext]",
        },
      },
    ],
    context: {
      emitFile: () => {},
    },
    readResource: fs.readFile.bind(fs),
  },
  (err, result) => (err ? console.error(err) : console.log(result))
);
To connect it to the loader, set it to capture name and pass it through webpack’s interpolator:
loaders/demo-loader.js
const loaderUtils = require("loader-utils");

module.exports = function(content) {
  const url = loaderUtils.interpolateName(this, "[hash].[ext]", {
    content,
  });
  const { name } = this.getOptions();
  const url = loaderUtils.interpolateName(this, name, { content });

  ...
};
After running (node ./run-loader.js), you should see something:
{
  result: [ 'export default __webpack_public_path__ + "demo.txt";' ],
  resourceBuffer: <Buffer 66 6f 6f 62 61 72 0a>,
  cacheable: true,
  fileDependencies: [ './demo.txt' ],
  contextDependencies: [],
  missingDependencies: []
}
You can see that the result matches what the loader should have returned. You can try to pass more options to the loader or use query parameters to see what happens with different combinations.
Connecting custom loaders with webpack#
To get the most out of loaders, you have to connect them with webpack. To achieve this, you can use imports:
src/component.js
import "!../loaders/demo-loader?name=foo!./main.css";
Given the definition is verbose, the loader can be aliased as below:
webpack.config.js
const commonConfig = merge([
  {
    resolveLoader: {
      alias: {
        "demo-loader": path.resolve(
          __dirname,
          "loaders/demo-loader.js"
        ),
      },
    },
  },
  ...
]);
With this change the import can be simplified:
import "!../loaders/demo-loader?name=foo!./main.css";
import "!demo-loader?name=foo!./main.css";
You could also handle the loader definition through rules and publish it as an npm package to consume.
this there. For example, mode is exposed.
Pitch loaders#
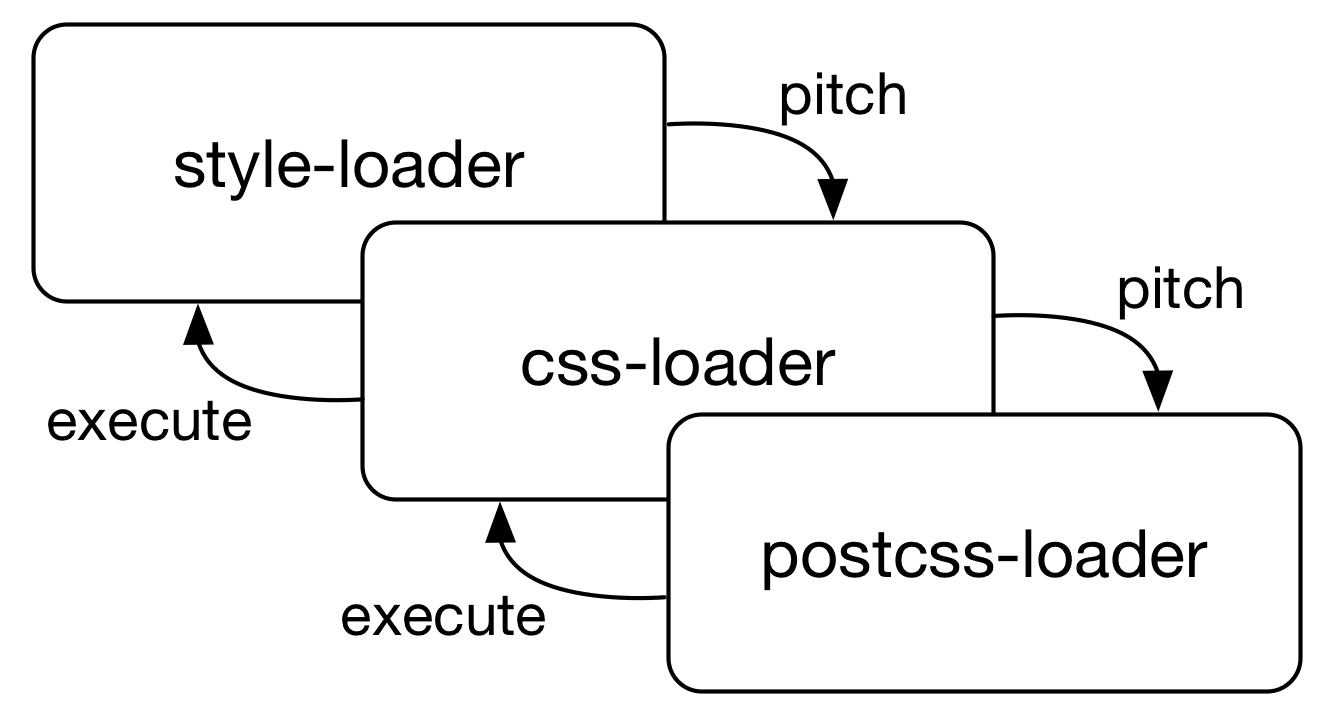
Webpack evaluates loaders in two phases: pitching and evaluating. If you are used to web event semantics, these map to capturing and bubbling. The idea is that webpack allows you to intercept execution during the pitching (capturing) phase. It goes through the loaders left to right first and executes them from right to left after that.
A pitch loader allows you shape the request and even terminate it. Set it up:
loaders/pitch-loader.js
const loaderUtils = require("loader-utils");

module.exports = function (input) {
  return input + this.getOptions().text;
};
module.exports.pitch = function (remaining, preceding, input) {
  console.log(`Remaining: ${remaining}, preceding: ${preceding}
Input: ${JSON.stringify(input, null, 2)}
  `);

  return "pitched";
};
To connect it to the runner, add it to the loader definition:
run-loader.js
runLoaders(
  {
    resource: "./demo.txt",
    loaders: [
      ...
      path.resolve(__dirname, "./loaders/pitch-loader"),
    ],
    ...
  },
  (err, result) => (err ? console.error(err) : console.log(result))
);
If you run (node ./run-loader.js) now, the pitch loader should log intermediate data and intercept the execution.
Caching with loaders#
Although webpack caches loaders by default unless they set this.cacheable(false), writing a caching loader can be a good exercise as it helps you to understand how loader stages can work together. The example below shows how to achieve this (courtesy of Vladimir Grenaderov):
const cache = new Map();

module.exports = function (content) {
  // Calls only once for given resourcePath
  const callbacks = cache.get(this.resourcePath);
  callbacks.forEach((callback) => callback(null, content));
  cache.set(this.resourcePath, content);

  return content;
};
module.exports.pitch = function () {
  if (cache.has(this.resourcePath)) {
    const item = cache.get(this.resourcePath);

    if (item instanceof Array) {
      item.push(this.async()); // Load to cache
    } else {
      return item; // Hit cache
    }
  } else {
    cache.set(this.resourcePath, []); // Missed cache
  }
};
A pitch loader can be used to attach metadata to the input to use later. In this example, a cache was constructed during the pitching stage, and it was accessed during normal execution.
Conclusion#
Writing loaders is fun in the sense that they describe transformations from a format to another. Often you can figure out how to achieve something specific by either studying either the API documentation or the existing loaders.
To recap:
- loader-runner is a valuable tool for understanding how loaders work. Use it for debugging how loaders work.
- Webpack loaders accept input and produce output based on it.
- Loaders can be either synchronous or asynchronous. In the latter case, you should use
this.async()webpack API to capture the callback exposed by webpack. - If you want to generate code dynamically for webpack entries, that’s where loaders can come in handy. A loader does not have to accept input. It’s acceptable that it returns only output in this case.
- When developing loaders locally, consider setting up a
resolveLoader.aliasto clean up references. - Pitching stage complements the default behavior allowing you to intercept and to attach metadata.
You’ll learn to write plugins in the next chapter. Plugins allow you to intercept webpack’s execution process, and they can be combined with loaders to develop more advanced functionality.