Understanding React Components#
As we have seen so far, React components are fairly simple. They can have internal state. They can also accept props. Beyond this React provides escape hatches that allow you to handle advanced use cases. These include lifecycle methods and refs. There are also a set of custom properties and methods you may want to be aware of.
Lifecycle Methods#
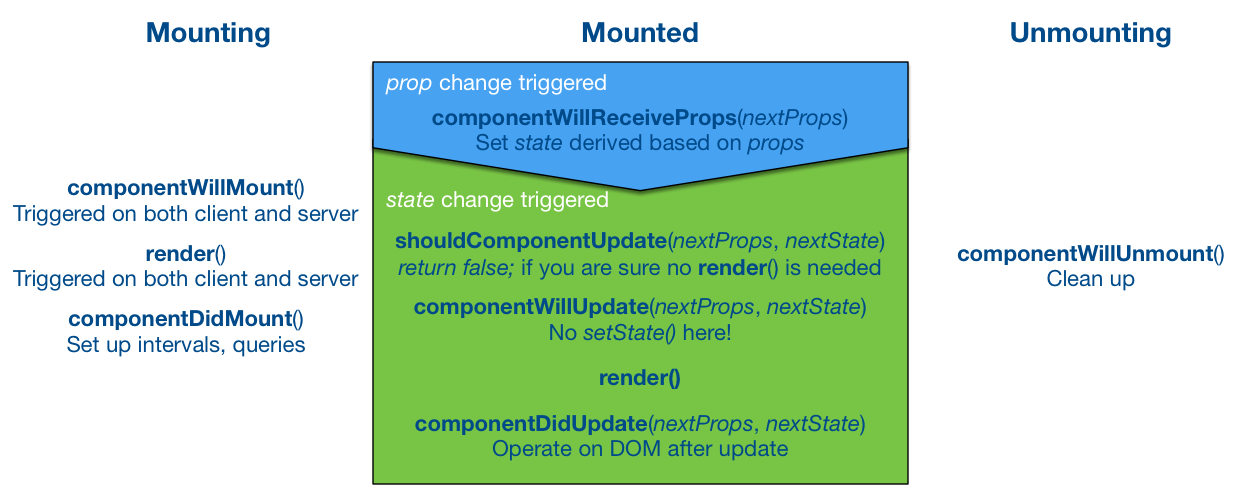
From the image above we can see that a React component has three phases during its lifecycle. It can be mounting, mounted, and unmounting. Each of these phases comes with related methods.
During the mounting phase you have access to the following:
componentWillMount()gets triggered once before any rendering. One way to use it would be to load data asynchronously there and force rendering throughsetState.render()will see the updated state and will be executed only once despite the state change. This will get triggered when rendering on a server.componentDidMount()gets triggered after initial rendering. You have access to the DOM here. You could use this hook to wrap a jQuery plugin within a component, for instance. This won’t get triggered when rendering on a server.
After a component has been mounted and it’s running, you can operate through the following methods:
componentWillReceiveProps(object nextProps)triggers when the component receives new props. You could, for instance, modify your component state based on the received props.shouldComponentUpdate(object nextProps, object nextState)allows you to optimize the rendering. If you check the props and state and see that there’s no need to update, returnfalse. This is where Immutable.js↗ and similar libraries come in handy thanks to their easy equality checks. The official documentation↗ goes to greater detail.componentWillUpdate(object nextProps, object nextState)gets triggered aftershouldComponentUpdateand beforerender(). It is not possible to usesetStatehere, but you can set class properties, for instance.componentDidUpdate(object nextProps, object nextState)is triggered after rendering. You can modify the DOM here. This can be useful for adapting other code to work with React.
Finally, when a component is unmounting, there’s one more hook you can use:
componentWillUnmount()is triggered just before a component is unmounted from the DOM. This is the ideal place to perform cleanup (e.g., remove running timers, custom DOM elements, and so on).
Often componentDidMount and componentWillUnmount come as a pair. If you set up something DOM related or a listener at componentDidMount, you also have to remember to clean it up at componentWillUnmount.
Refs#
React’s refs↗ allow you to access the underlying DOM structure easily. Using them will bind your code to the web, but sometimes there’s no way around this if you are measuring components for instance.
Refs need a backing instance. This means they will work only with React.createClass or class based component definitions. The basic idea goes as follows:
<input type="text" ref="input" />

...

// Access somewhere
this.refs.input
In addition to strings, refs support a callback that gets called right after the component is mounted. You can do some initialization here or capture the reference:
<input type="text" ref={element => element.focus()} />
Custom Properties and Methods#
Beyond the lifecycle methods and refs, there are a variety of properties and methods↗ you should be aware of especially if you are going to use React.createClass:
displayName- It is preferable to setdisplayNameas that will improve debug information. For ES6 classes this is derived automatically based on the class name. You can attachdisplayNameto an anonymous function based component as well.getInitialState()- In class based approach the same can be achieved throughconstructor.getDefaultProps()- In classes you can set these inconstructor.render()- This is the workhorse of React. It must return a single node↗ as returning multiple won’t work!mixins-mixinscontains an array of mixins to apply to components.statics-staticscontains static properties and method for a component. In ES6 you can assign them to the class as below:
class Note {
  render() {
    ...
  }
}
Note.willTransitionTo = () => {...};

export default Note;
This could also be written as:
class Note {
  static willTransitionTo() {...}
  render() {
    ...
  }
}

export default Note;
Some libraries, such as React DnD, rely on static methods to provide transition hooks. They allow you to control what happens when a component is shown or hidden. By definition statics are available through the class itself.
React components allow you to document the interface of your component using propTypes as below.
const Note = ({task}) => <div>{task}</div>;
Note.propTypes = {
  task: React.PropTypes.string.isRequired
}
To understand propTypes better, read the Typing with React chapter.
React Component Conventions#
I prefer to have the constructor first, followed by lifecycle methods, render(), and finally, methods used by render(). This top-down approach makes it straightforward to follow code. There is also an inverse convention that leaves render() as the last method. Naming conventions vary as well. You will have to find conventions which work the best for you.
You can enforce a convention by using a linter such as ESLint↗. Using a linter decreases the amount of friction when working on code written by others. Even on personal projects, using tools to verify syntax and standards for you can be useful. It lessens the amount and severity of mistakes and allows you to spot them early.
By setting up a continuous integration system you can test against multiple platforms and catch possible regressions early. This is particularly important if you are using lenient version ranges. Sometimes dependencies might have problems and it’s good to catch those.
Conclusion#
Even though React’s component definition is fairly simple, it’s also powerful and pragmatic. Especially the advanced parts can take a while to master, but it’s good to know they are there.
We’ll continue the implementation in the next chapter as we allow the user to edit individual notes.