Implementing a Note Application
#
Now that we have a nice development setup, we can actually get some work done. Our goal here is to end up with a crude note-taking application. It will have basic manipulation operations. We will grow our application from scratch and get into some trouble. This way you will understand why architectures, such as Flux, are needed.
Initial Data Model
#
Often a good way to begin designing an application is to start with the data. We can model a list of notes as follows:
[
  {
    id: '4e81fc6e-bfb6-419b-93e5-0242fb6f3f6a',
    task: 'Learn React'
  },
  {
    id: '11bbffc8-5891-4b45-b9ea-5c99aadf870f',
    task: 'Do laundry'
  }
];
Each note is an object which will contain the data we need, including an id and a task we want to perform. Later on it is possible to extend this data definition to include things like the note color or the owner.
We could have skipped ids in our definition. This would become problematic as we grow the application and add the concept of references to it. Each Kanban lane needs to be able to refer to some notes after all. By adopting proper indexing early on, we save ourselves some effort later.
[<id> -> { id: '...', task: '...' }] kind of structure. Even though there’s some redundancy, it is convenient to operate using the structure as it gives us easy access by index. The structure becomes even more useful once we start getting references between data entities.
Rendering Initial Data
#
Now that we have a rough data model together, we can try rendering it through React. We are going to need a component to hold the data. Let’s call it Notes for now. We can grow from that as we want more functionality. Set up a file with a small dummy component as follows:
app/components/Notes.jsx
import React from 'react';

const notes = [
  {
    id: '4e81fc6e-bfb6-419b-93e5-0242fb6f3f6a',
    task: 'Learn React'
  },
  {
    id: '11bbffc8-5891-4b45-b9ea-5c99aadf870f',
    task: 'Do laundry'
  }
];

export default () => (
  <ul>{notes.map(note =>
    <li key={note.id}>{note.task}</li>
  )}</ul>
)
We are using various important features of JSX in the snippet above. I have annotated the difficult parts below:
<ul>{notes.map(note => ...)}</ul>-{}’s allow us to mix JavaScript syntax within JSX.mapreturns a list oflielements for React to render.<li key={note.id}>{note.task}</li>- In order to tell React which items have been changed, added, or removed, we use thekeyproperty. It is important that this is unique or else React won’t be able to figure out the correct order in which to render. If not set, React will give a warning. See Multiple Components↗ for more information.
We also need to refer to the component from the entry point of our application:
app/index.jsx
import React from 'react';
import ReactDOM from 'react-dom';
import Notes from './components/Notes';

if(process.env.NODE_ENV !== 'production') {
  React.Perf = require('react-addons-perf');
}

ReactDOM.render(
  <div>Hello world</div>,
  <Notes />,
  document.getElementById('app')
);
If you run the application now, you should see a list of notes. It’s not particularly pretty or useful yet, but it’s a start:

import React to Notes.jsx given there’s that JSX to JavaScript transformation going on. Without it the resulting code would fail.
Generating the Ids
#
Normally the problem of generating the ids is solved by a back-end. As we don’t have one yet, we’ll use a standard known as RFC4122↗ instead. It allows us to generate unique ids. We’ll be using a Node.js implementation known as uuid and its uuid.v4 variant. It will give us ids, such as 1c8e7a12-0b4c-4f23-938c-00d7161f94fc and they are guaranteed to be unique with a very high probability.
To connect the generator with our application, modify it as follows:
app/components/Notes.jsx
import React from 'react';
import uuid from 'uuid';

const notes = [
  {
    id: '4e81fc6e-bfb6-419b-93e5-0242fb6f3f6a',
    id: uuid.v4(),
    task: 'Learn React'
  },
  {
    id: '11bbffc8-5891-4b45-b9ea-5c99aadf870f',
    id: uuid.v4(),
    task: 'Do laundry'
  }
];

...
The development setup will install the uuid dependency automatically. Once that has happened and the application has refreshed, everything should still look the same. If you try debugging it, you can see the ids should change if you refresh. You can verify this easily either by inserting a console.log(notes); line or a debugger;↗ statement within the component function.
The debugger; statement is particularly useful as it tells the browser to break execution. This way you can examine the current call stack and examine the available variables. If you are unsure of something, this is a great way to debug and figure out what’s going on.
console.log is a lighter alternative. You can even design a logging system around it and use the techniques together. See MDN↗ and Chrome documentation↗ for the full API.
Adding New Notes to the List
#
Even though we can display individual notes now, we are still missing a lot of logic to make our application useful. A logical way to start would be to implement adding new notes to the list. To achieve this, we need to expand the application a little.
Defining a Stub for App#
AppTo enable adding new notes, we should have a button for that somewhere. Currently our Notes component does only one thing, display notes. That’s perfectly fine. To make room for more functionality, we could add a concept known as App on top of that. This component will orchestrate the execution of our application. We can add the button we want there and manage state as well as we add notes. At a basic level App could look like this:
app/components/App.jsx
import React from 'react';
import Notes from './Notes';

export default () => <Notes />;
All it does now is render Notes, so it’s going to take more work to make it useful. To glue App to our application, we still need to tweak the entry point as follows:
app/index.jsx
import React from 'react';
import ReactDOM from 'react-dom';
import Notes from './components/Notes';
import App from './components/App';

if(process.env.NODE_ENV !== 'production') {
  React.Perf = require('react-addons-perf');
}

ReactDOM.render(
  <Notes />,
  <App />,
  document.getElementById('app')
);
If you run the application now, it should look exactly the same as before. But now we have room to grow.
Adding a Stub for Add Button
#
A good step towards something more functional is to add a stub for an add button. To achieve this, App needs to evolve:
app/components/App.jsx
import React from 'react';
import Notes from './Notes';

export default () => <Notes />;
export default () => (
  <div>
    <button onClick={() => console.log('add note')}>+</button>
    <Notes />
  </div>
);
If you press the button we added, you should see an “add note” message at the browser console. We still have to connect the button with our data somehow. Currently the data is trapped within the Notes component so before we can do that, we need to extract it to the App level.
div.
Pushing Data to App#
AppTo push the data to App we need to make two modifications. First we need to literally move it there and pass the data through a prop to Notes. After that we need to tweak Notes to operate based on the new logic. Once we have achieved this, we can start thinking about adding new notes.
The App side is simple:
app/components/App.jsx
import React from 'react';
import uuid from 'uuid';
import Notes from './Notes';

const notes = [
  {
    id: uuid.v4(),
    task: 'Learn React'
  },
  {
    id: uuid.v4(),
    task: 'Do laundry'
  }
];

export default () => (
  <div>
    <button onClick={() => console.log('add note')}>+</button>
    <Notes />
    <Notes notes={notes} />
  </div>
);
This won’t do much until we tweak Notes as well:
app/components/Notes.jsx
import React from 'react';
import uuid from 'uuid';

const notes = [
  {
    id: uuid.v4(),
    task: 'Learn React'
  },
  {
    id: uuid.v4(),
    task: 'Do laundry'
  }
];

export default () => {
export default ({notes}) => (
  <ul>{notes.map(note =>
    <li key={note.id}>{note.task}</li>
  )}</ul>
);
Our application should look exactly the same as it did before these changes. Now we are ready to add some logic to it.
notes from props (the first parameter) is a standard trick you see with React. If you want to access the remaining props, you can use {notes, ...props} kind of syntax. We’ll use this later so you can get a better feel for how this works and why you might use it.
Pushing State to App#
AppNow that we have everything in the right place, we can start to worry about modifying the data. If you have used JavaScript before, the intuitive way to handle it would be to set up an event handler like () => notes.push({id: uuid.v4(), task: 'New task'}). If you try this, you’ll see that nothing happens.
The reason why is simple. React cannot notice the structure has changed and won’t react accordingly (that is, trigger render()). To overcome this issue, we can implement our modification through React’s own API. This makes it notice that the structure has changed. As a result it is able to render() as we might expect.
As of the time of writing, the function based component definition doesn’t support the concept of state. The problem is that these components don’t have a backing instance. It is something in which you would attach state. We might see a way to solve this through functions only in the future but for now we have to use a heavy duty alternative.
In addition to functions, you can create React components through React.createClass or a class based component definition. In this book we’ll use function based components whenever possible. If there’s a good reason why those can’t work, then we’ll use the class based definition instead.
In order to convert our App to a class based component, adjust it as follows to push the state within:
app/components/App.jsx
import React from 'react';
import uuid from 'uuid';
import Notes from './Notes';

const notes = [
  {
    id: uuid.v4(),
    task: 'Learn React'
  },
  {
    id: uuid.v4(),
    task: 'Do laundry'
  }
];

export default () => (
  <div>
    <button onClick={() => console.log('add note')}>+</button>
    <Notes notes={notes} />
  </div>
);

export default class App extends React.Component {
  constructor(props) {
    super(props);

    this.state = {
      notes: [
        {
          id: uuid.v4(),
          task: 'Learn React'
        },
        {
          id: uuid.v4(),
          task: 'Do laundry'
        }
      ]
    };
  }
  render() {
    const {notes} = this.state;

    return (
      <div>
        <button onClick={() => console.log('add note')}>+</button>
        <Notes notes={notes} />
      </div>
    );
  }
}
After this change App owns the state even though the application still should look the same as before. We can begin to use React’s API to modify the state.
props to super by convention. If you don’t pass it, this.props won’t get set! Calling super invokes the same method of the parent class and you see this kind of usage in object oriented programming often.
Implementing Note Adding Logic
#
Note Adding Logic
All the effort will pay off soon. We have just one step left. We will need to use React’s API to manipulate the state and to finish our feature. React provides a method known as setState for this purpose. In this case we will need to call it like this: this.setState({... new state goes here ...}, () => ...).
The callback is optional. React will call it when the state has been set and often you don’t need to care about it at all. Once setState has gone through, React will call render(). The asynchronous API might feel a little strange at first but it will allow React to optimize its performance by using techniques such as batching updates. This all ties back to the concept of Virtual DOM.
One way to trigger setState would be to push the associated logic to a method of its own and then call it when a new note is added. The class based component definition doesn’t bind custom methods like this by default so we will need to handle the binding somehow. It would be possible to do that at the constructor, render(), or by using a specific syntax. I’m opting for the syntax option in this book. Read the Language Features appendix to learn more.
To tie the logic with the button, adjust App as follows:
app/components/App.jsx
import React from 'react';
import uuid from 'uuid';
import Notes from './Notes';

export default class App extends React.Component {
  constructor(props) {
    ...
  }
  render() {
    const {notes} = this.state;

    return (
      <div>
        <button onClick={() => console.log('add note')}>+</button>
        <button onClick={this.addNote}>+</button>
        <Notes notes={notes} />
      </div>
    );
  }
  addNote = () => {
    // It would be possible to write this in an imperative style.
    // I.e., through `this.state.notes.push` and then
    // `this.setState({notes: this.state.notes})` to commit.
    //
    // I tend to favor functional style whenever that makes sense.
    // Even though it might take more code sometimes, I feel
    // the benefits (easy to reason about, no side effects)
    // more than make up for it.
    //
    // Libraries, such as Immutable.js, go a notch further.
    this.setState({
      notes: this.state.notes.concat([{
        id: uuid.v4(),
        task: 'New task'
      }])
    });
  }
}
Given we are binding to an instance here, the hot loading setup cannot pick up the change. To try out the new feature, refresh the browser and try clicking the + button. You should see something:
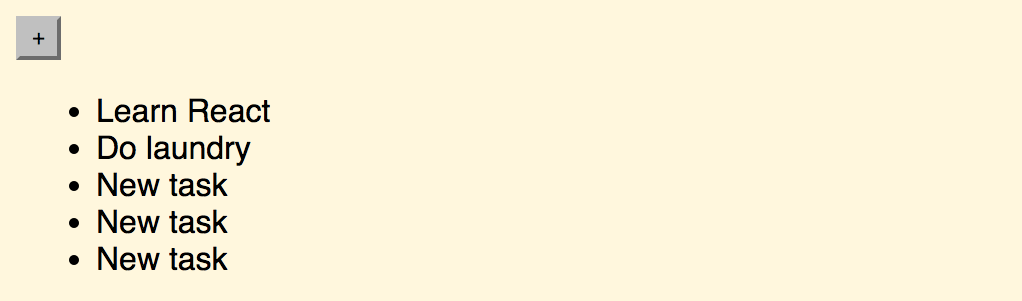
this.setState({notes: [...this.state.notes, {id: uuid.v4(), task: 'New task'}]}) to achieve the same result. This spread operator↗ can be used with function parameters as well. See the Language Features appendix for more information.
@autobind annotation either on class or method level. To learn more about decorators, read the Understanding Decorators appendix.
Conclusion
#
Even though we have a rough application together now, we are still missing two crucial features: editing and deleting notes. It’s a good time to focus on those next. Let’s do deletion first and handle editing after that.