Editing Notes#
Editing notes is a similar problem as deleting them. The data flow is exactly the same. We’ll need to define an onEdit callback and bind an id of the note being edited at Notes.
What makes this scenario difficult is the user interface requirement. It’s not enough just to have a button. We’ll need some way to allow the user to input a new value which we can then commit to the data model.
One way to achieve this is to implement so called inline editing. The idea is that when a user click a note, we’ll show an input. After the user has finished editing and signals that by hitting enter or clicking outside of the field (blur event), we’ll capture the value and update.
Implementing Editable#
To keep the application clean, I’ll wrap this behavior into a component known as Editable. It will give us an API like this:
<Editable
  editing={editing}
  value={task}
  onEdit={onEdit.bind(null, id)} />
This is an example of a controlled component. We’ll control the editing state explicitly from outside of the component. This gives us more power, but it also makes Editable more involved to use.
on prefix. This will allow you to distinguish them from other props and keep your code a little tidier.
Controlled vs. Uncontrolled Design#
An alternative way to handle this would have been to leave the control over the editing state to Editable. This uncontrolled way of designing can be valid if you don’t want to do anything with the state outside of the component.
It is possible to use both of these designs together. You can even have a controlled component that has uncontrolled elements inside. In this case we’ll end up using an uncontrolled design for the input that Editable will contain for example. Even that could be turned into something controlled should we want to.
Logically Editable consists of two separate portions. We’ll need to display the default value while we are not editing. In case we are editing, we’ll want to show an Edit control instead. In this case we’ll settle for a simple input as that will do the trick.
Before digging into the details, we can implement a little stub and connect that to the application. This will give us the basic structure we need to grow the rest. To get started, we’ll adjust the component hierarchy a notch to make it easier to implement the stub.
Extracting Rendering from Note#
Currently Note controls what is rendered inside it. It renders the passed task and connects a deletion button. We could push Editable inside it and handle the wiring through Note interface. Even though that might be one valid way to do it, we can push the rendering concern on a higher level.
Having the concept of Note is useful especially when we’ll expand the application further so there’s no need to remove it. Instead, we can give the control over its rendering behavior to Notes and wire it there.
React provides a prop known as children for this purpose. Adjust Note and Notes as follows to push the control over Note rendering to Notes:
app/components/Note.jsx
import React from 'react';

export default ({task, onDelete}) => (
  <div>
    <span>{task}</span>
    <button onClick={onDelete}>x</button>
  </div>
);
export default ({children, ...props}) => (
  <div {...props}>
    {children}
  </div>
);
app/components/Notes.jsx
import React from 'react';
import Note from './Note';

export default ({notes, onDelete=() => {}}) => (
  <ul>{notes.map(({id, task}) =>
    <li key={id}>
      <Note
        onDelete={onDelete.bind(null, id)}
        task={task} />
      <Note>
        <span>{task}</span>
        <button onClick={onDelete.bind(null, id)}>x</button>
      </Note>
    </li>
  )}</ul>
)
Now that we have room to work, we can set up a stub for Editable.
Adding Editable Stub#
We can model a rough starting point based on our specification as below. The idea is that we’ll branch based on the editing prop and attach the props needed for implementing our logic:
app/components/Editable.jsx
import React from 'react';

export default ({editing, value, onEdit, ...props}) => {
  if(editing) {
    return <Edit value={value} onEdit={onEdit} {...props} />;
  }

  return <span {...props}>value: {value}</span>;
}

const Edit = ({onEdit = () => {}, value, ...props}) => (
  <div onClick={onEdit} {...props}>
    <span>edit: {value}</span>
  </div>
);
To see our stub in action we still need to connect it with our application.
Connecting Editable with Notes#
We still need to replace the relevant portions of the code to point at Editable. There are more props to track and to connect:
app/components/Notes.jsx
import React from 'react';
import Note from './Note';
import Editable from './Editable';

export default ({notes, onDelete=() => {}}) => (
export default ({
  notes,
  onNoteClick=() => {}, onEdit=() => {}, onDelete=() => {}
}) => (
  <ul>{notes.map(({id, task}) =>
    <li key={id}>
      <Note>
        <span>{task}</span>
        <button onClick={onDelete.bind(null, id)}>x</button>
      </Note>
    </li>
  )}</ul>
  <ul>{notes.map(({id, editing, task}) =>
    <li key={id}>
      <Note onClick={onNoteClick.bind(null, id)}>
        <Editable
           editing={editing}
           value={task}
           onEdit={onEdit.bind(null, id)} />
        <button onClick={onDelete.bind(null, id)}>x</button>
      </Note>
    </li>
  )}</ul>
)
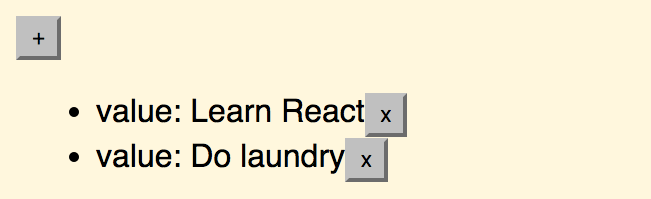
If everything went right, you should see something like this:
Tracking Note editing State#
We are still missing logic needed to control the Editable. Given the state of our application is maintained at App, we’ll need to deal with it there. It should set the editable flag of the edited note to true when we begin to edit and set it back to false when we complete the editing process. We should also adjust its task using the new value. For now we are interested in just getting the editable flag to work, though. Modify as follows:
app/components/App.jsx
...

export default class App extends React.Component {
  constructor(props) {
    ...
  }
  render() {
    const {notes} = this.state;

    return (
      <div>
        <button onClick={this.addNote}>+</button>
        <Notes notes={notes} onDelete={this.deleteNote} />
        <Notes
          notes={notes}
          onNoteClick={this.activateNoteEdit}
          onEdit={this.editNote}
          onDelete={this.deleteNote}
          />
      </div>
    );
  }
  addNote = () => {
    ...
  }
  deleteNote = (id, e) => {
    ...
  }
  activateNoteEdit = (id) => {
    this.setState({
      notes: this.state.notes.map(note => {
        if(note.id === id) {
          note.editing = true;
        }

        return note;
      })
    });
  }
  editNote = (id, task) => {
    this.setState({
      notes: this.state.notes.map(note => {
        if(note.id === id) {
          note.editing = false;
          note.task = task;
        }

        return note;
      })
    });
  }
}
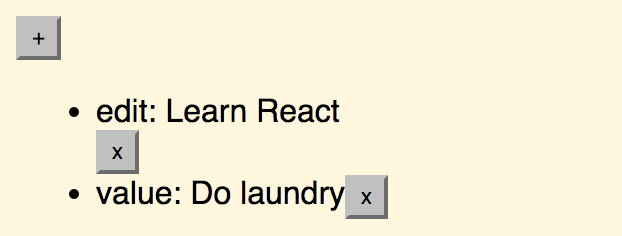
If you try to edit a Note now, you should see something like this:
If you click a Note twice to confirm the edit, you should see an Uncaught Invariant Violation error at the browser console. This happens because we don’t deal with task correctly yet. We have bound only id and task will actually point to an event object provided by React. This is something we should fix next.
{<id>: {id: <id>, task: <str>}}), it would be possible to write the operations using Object.assign and avoid mutation.
activateNoteEdit and editNote.
Implementing Edit#
We are missing one more part to make this work. Even though we can manage the editing state per Note now, we still can’t actually edit them. For this purpose we need to expand Edit and make it render a text input for us.
In this case we’ll be using uncontrolled design and extract the value of the input from the DOM only when we need it. We don’t need more control than that here.
Consider the code below for the full implementation. Note how we are handling finishing the editing. We capture onKeyPress and check for Enter to confirm editing. We also run the finish logic onBlur so that we can end the editing when the input loses focus:
app/components/Editable.jsx
...


export default ({editing, value, onEdit, ...props}) => {
  if(editing) {
    return <Edit value={value} onEdit={onEdit} {...props} />;
  }

  return <span {...props}>value: {value}</span>;
  return <span {...props}>{value}</span>;
}

const Edit = ({onEdit = () => {}, value, ...props}) => (
  <div onClick={onEdit} {...props}>
    <span>edit: {value}</span>
  </div>
);
class Edit extends React.Component {
  render() {
    const {value, onEdit, ...props} = this.props;

    return <input
      type="text"
      autoFocus={true}
      defaultValue={value}
      onBlur={this.finishEdit}
      onKeyPress={this.checkEnter}
      {...props} />;
  }
  checkEnter = (e) => {
    if(e.key === 'Enter') {
      this.finishEdit(e);
    }
  }
  finishEdit = (e) => {
    const value = e.target.value;

    if(this.props.onEdit) {
      this.props.onEdit(value);
    }
  }
}
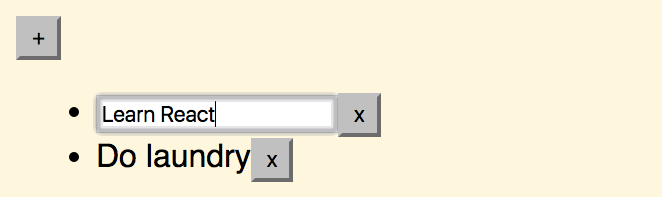
If you refresh and edit a note, the commits should go through:
On Namespacing Components#
We could have approached Editable in a different way. In an earlier edition of this book I ended up developing it as a single component. I handled rendering the value and the edit control through methods (i.e., renderValue). Often method naming like that is a clue that it’s possible to refactor your code and extract separate components like we did here.
You can go one step further and namespace↗ your component parts. It would have been possible to define Editable.Value and Editable.Edit components. Better yet, we could have allowed the user to swap those components through props. As long as the interface is the same, the components should work. This would give an extra dimension of customizability.
Implementation-wise we would have had to do something like this in case we had gone with namespacing:
app/components/Editable.jsx
import React from 'react';

// We could allow edit/value to be swapped here through props
const Editable = ({editing, value, onEdit}) => {
  if(editing) {
    return <Editable.Edit value={value} onEdit={onEdit} />;
  }

  return <Editable.Value value={value} />;
};

Editable.Value = ({value, ...props}) => <span {...props}>{value}</span>

class Edit extends React.Component {
  ...
}
Editable.Edit = Edit;

// We could export individual components too to allow modification
export default Editable;
You can use a similar approach for more generic components as well. Consider something like Form. You could easily have Form.Label, Form.Input, Form.Textarea and so on. Each would contain your custom formatting and logic as needed. This is one way to make your designs more flexible.
Conclusion#
It took quite a few steps, but we can edit our notes now. Best of all, Editable should be useful whenever we need to edit some property. We could have extracted the logic later on as we see duplication, but this is one way to do it.
Even though the application kind of works, it is still quite ugly. We’ll do something about that in the next chapter as we add basic styling to it.